

HONSIMBA Automatic Cap Sealing Machine Operating Step-by-Step Guide
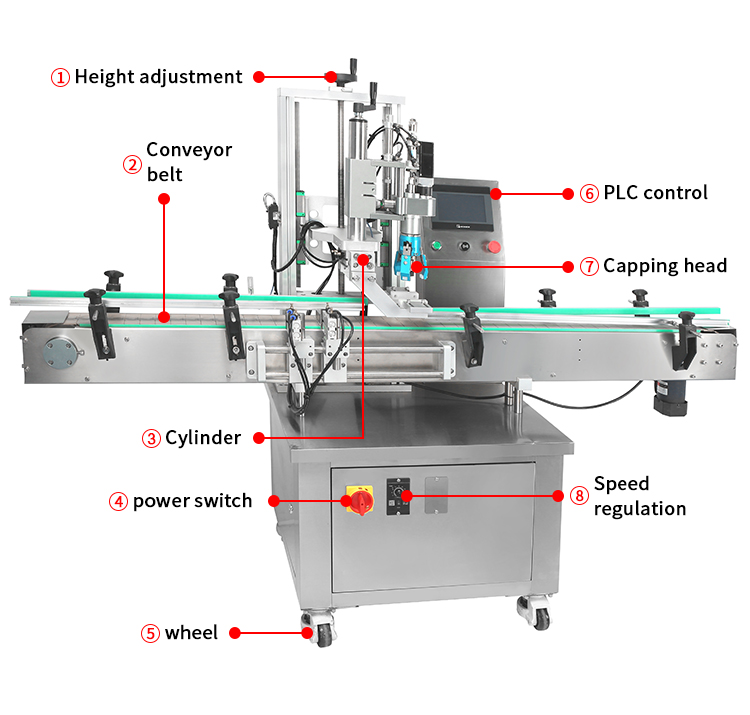
HONSIMBA Automatic Cap Sealing Machine is a high-performance sealing equipment, primarily designed to simplify the cap sealing process for various bottle types, and enhance sealing efficiency and stability. This guide will explain the installation, debugging, and operation procedures of the equipment step by step, helping users standardize their operations and ensure the equipment operates at its best performance.
## Step 1: Equipment Installation and Fixation
1. First, place the equipment steadily on a level and sturdy work surface to ensure the body is firmly positioned without any shaking or tilting.
2. According to the local power supply standards (110V or 220V), connect the power supply in accordance with the wiring instructions, ensuring the connections are secure and the grounding is good.
3. Before conducting the actual operation, be sure to read through the safety operation clauses in the user manual, familiarize yourself with all safety precautions, and then proceed with the subsequent operations.
## Step 2: Adjustment of the Cap Rolling Wheels
The equipment is equipped with four sets of cap rolling wheels, which are the core components responsible for providing the sealing torque and clamping force. The positions, spacing, and fastening mechanisms of the wheels need to be precisely adjusted according to the size of the cap to be sealed and the specifications of the bottle body to ensure a proper fit between the wheels and the cap. The specific adjustment steps, scales, and fastening methods can be found in the detailed instructions provided in the user manual.
## Step 3: Preparation for Bottle Sealing
1. Prior to sealing, organize the bottles and their caps properly, ensuring that the surface of the caps is clean, free of debris, stains, or other contaminants, to prevent impurities from affecting the sealing effect;
2. Place the pre-treated bottles on the conveyor belt of the equipment or precisely in the designated cap-laying station, ensuring that the bottles are placed upright and without tilting or deviation.
## Step 4: Equipment Startup and Mode Setting
1. After confirming that the power connection is normal, press the power-on button to start the equipment. Wait until the equipment completes self-check and enters standby mode.
2. According to production requirements (such as sealing speed, torque size), select the corresponding sealing mode on the operation panel. Ensure that the mode parameters match the bottle type and bottle cap.
## Step 5: Automatic Cap Sealing Process Execution
1. Secure the cap precisely onto the bottle opening, ensuring that the cap and the bottle are perfectly aligned without any skew.
2. Once the equipment sensor detects the bottle in place, the automatic sealing process will be triggered. Four sets of rollers will complete the screwing and tightening operations according to the preset torque and force.
3. During the operation, it is necessary to observe the equipment's operating status in real time. If there are issues such as bottle jamming or loose screwing, the equipment should be stopped immediately, and the roller parameters or the bottle placement position should be adjusted.
## Step 6: Quality Inspection and Optimization of Cap Sealing
1. After the sealing process is completed, randomly select finished bottles for inspection. The focus is on confirming whether the cap seal is tight and properly aligned with the bottle opening, without any looseness or deviation;
2. Conduct a sealing integrity test on the finished products (such as inverted test, pressure test) to verify whether the sealing quality meets the standards;
3. If any sealing issues are detected during the inspection, the position of the rollers and torque parameters of the equipment need to be adjusted, and the test needs to be repeated until a qualified sealing effect is achieved.